
https://github.com/microsoft/autogen
GitHub - microsoft/autogen: Enable Next-Gen Large Language Model Applications. Join our Discord: https://discord.gg/pAbnFJrkgZ
Enable Next-Gen Large Language Model Applications. Join our Discord: https://discord.gg/pAbnFJrkgZ - GitHub - microsoft/autogen: Enable Next-Gen Large Language Model Applications. Join our Discord:...
github.com
https://microsoft.github.io/autogen/docs/Getting-Started/
Getting Started | AutoGen
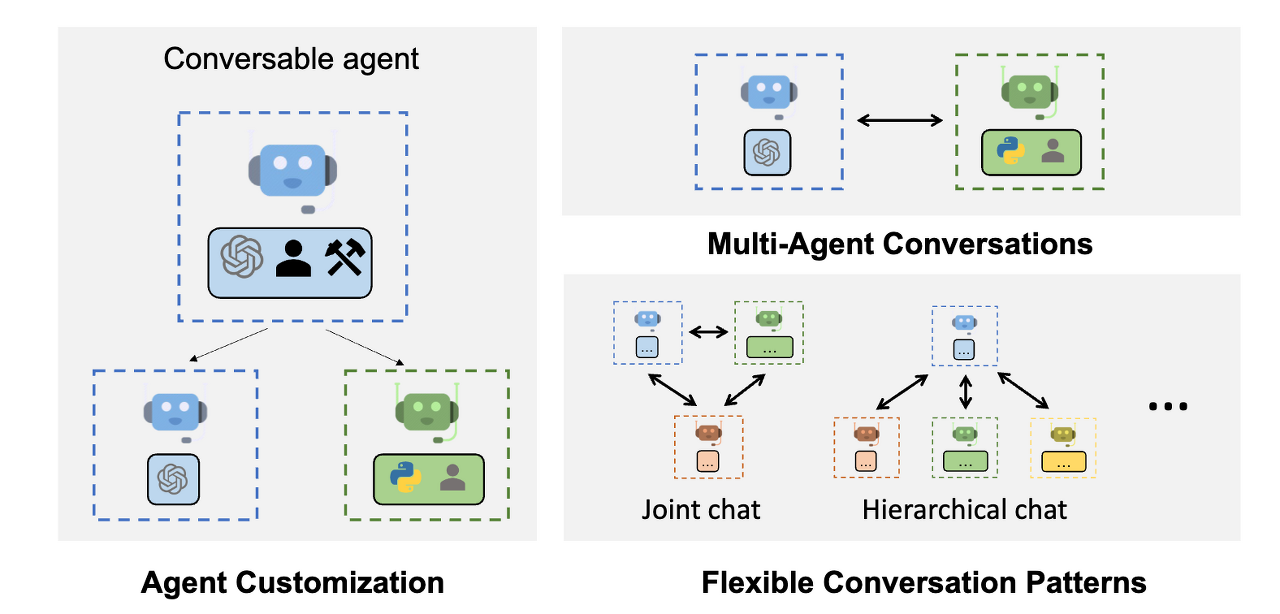
AutoGen is a framework that enables development of LLM applications using multiple agents that can converse with each other to solve task. AutoGen agents are customizable, conversable, and seamlessly allow human participation. They can operate in various m
microsoft.github.io
Microsoft에서 공개한 Agent AutoGen
AutoGen은 Copilot에 memory를 추가했다고 보면다. copilot은 code guide chatbot이며 코드를 해석해주고 작성해준다. 여기서 AutoGen은 memory를 추가해 내가 원하는 최종 목표의 결과물에 도달할 수 있게 질문을 통해 살을 붙여 만든다.
AutoGen을 사용하면 최소한의 노력으로 멀티 에이전트 대화를 기반으로 차세대 LLM 애플리케이션을 구축할 수 있습니다. 복잡한 LLM 워크플로우의 오케스트레이션, 자동화 및 최적화를 간소화합니다. LLM 모델의 성능을 극대화하고 약점을 극복합니다.
복잡한 워크플로우를 위한 다양한 대화 패턴을 지원합니다. 개발자는 커스터마이징이 가능한 대화형 에이전트를 통해 AutoGen을 사용하여 대화 자율성, 에이전트 수, 에이전트 대화 토폴로지와 관련된 다양한 대화 패턴을 구축할 수 있습니다.
다양한 복잡성을 가진 작업 시스템 모음을 제공합니다. 이러한 시스템은 다양한 도메인과 복잡성을 가진 광범위한 애플리케이션에 걸쳐 있습니다. 이 시스템들은 AutoGen이 어떻게 다양한 대화 패턴을 쉽게 지원할 수 있는지 보여줍니다.
AutoGen은 향상된 추론 API로서 openai.Completion 또는 openai.ChatCompletion을 대체할 수 있는 드롭인 기능을 제공합니다. 이를 통해 간편한 성능 튜닝, API 통합 및 캐싱과 같은 유틸리티, 오류 처리, 다중 구성 추론, 컨텍스트 프로그래밍 등과 같은 고급 사용 패턴을 사용할 수 있습니다.
AutoGen은 Microsoft, 펜실베니아 주립대학교, 워싱턴 대학교의 공동 연구를 기반으로 합니다.
사용법
1) config List 정의 (사용할 chatgpt 모델과 API key setting)
* 환경 변수로 OPENAI_API_KEY를 미리 등록해 놓으면 따로 test는 실행 가능
from autogen import AssistantAgent, UserProxyAgent, config_list_from_json
# Load LLM inference endpoints from an env variable or a file
# See https://microsoft.github.io/autogen/docs/FAQ#set-your-api-endpoints
# and OAI_CONFIG_LIST_sample.json
config_list = config_list_from_json(env_or_file="OAI_CONFIG_LIST")// Please modify the content, remove this comment and rename this file to OAI_CONFIG_LIST to run the sample code.
[
{
"model": "gpt-4",
"api_key": "<your OpenAI API key here>"
},
{
"model": "gpt-4",
"api_key": "<your Azure OpenAI API key here>",
"api_base": "<your Azure OpenAI API base here>",
"api_type": "azure",
"api_version": "2023-07-01-preview"
},
{
"model": "gpt-3.5-turbo",
"api_key": "<your Azure OpenAI API key here>",
"api_base": "<your Azure OpenAI API base here>",
"api_type": "azure",
"api_version": "2023-07-01-preview"
}
]
2) assistant (사용 모델을 부여한 후), user_proxy (목표 테스크 전달)
assistant = AssistantAgent("assistant", llm_config={"config_list": config_list})
user_proxy = UserProxyAgent("user_proxy", code_execution_config={"work_dir": "coding"})
user_proxy.initiate_chat(assistant, message="How do I make a Slack bot?")
# This initiates an automated chat between the two agents to solve the task
user_proxy (to assistant):
I want make a slack bot
--------------------------------------------------------------------------------
assistant (to user_proxy):
Alright, creating a Slack bot can be quite involved process but Python makes it a bit simpler. We would be using Python slack_sdk (previously called `slackclient`) to create the bot. Here's a simple script for you to set up a Slack bot.
First, you will need to create a bot on Slack. Here are the step-by-step procedure:
1. Visit your slack workspace (the URL would be something like: workspace-name.slack.com)
2. Click on "Apps" on the left menu next to the workspace name.
3. Click on "Build your own" on the top right of the Apps page and select "Make a Custom Integration".
4. You will be redirected to a new page. Click on "Bots".
5. Enter a username for your bot and click "Add Bot Integration".
6. Keep this page open as you will need the API Token listed here in the next steps.
SSH into your server and type following commands:
```sh
pip install slack_sdk
```
Let's create a simple bot that echoes back whatever message it receives.
```python
# filename: slack_bot.py
import slack_sdk
from slack_sdk.webhook import WebhookClient
SLACK_API_TOKEN = 'YOUR-SLACK-BOT-API-TOKEN'
def bot_send_message(channel_id, text):
client = slack_sdk.WebClient(token=SLACK_API_TOKEN)
client.chat_postMessage(channel=channel_id, text=text)
if __name__ == "__main__":
bot_send_message('CHANNEL-ID', 'Hello, World!')
```
Replace `'YOUR-SLACK-BOT-API-TOKEN'` with the API token of your bot, and replace `'CHANNEL-ID'` with the ID of the channel to which you want the bot to send the message. This bot will send 'Hello, World!' to the specified slack channel.
Note: you can find your channel ID in the URL when you click on the channel. It should be something like `https://app.slack.com/client/TXXXXXXXX/CXXXXXXXX/thread/CXXXXXXXX-XXXXXXXXX-XXXXXXXXX`. The `CXXXXXXXX` is your channel ID.
Just save this python file and run it, the bot will sent 'Hello, World!' to your channel.
```sh
python slack_bot.py
```
This is an introductory example on a Slack bot. With the API, you can achieve a lot more things such as automated responses, scheduled messages, and so on. Please carefully handle your API tokens since they are sensitive information.
I hope this helps. Let me know if you encounter any issues.
--------------------------------------------------------------------------------
Provide feedback to assistant. Press enter to skip and use auto-reply, or type 'exit' to end the conversation:
*Provide feedback to assistant. Press enter to skip and use auto-reply, or type 'exit' to end the conversation:
3) 결과를 보고 assistant에게 feedback을 전달하거나 exit 종료한다.
'Tools > ChatGPT' 카테고리의 다른 글
| [Function calling] ChatGPT custom Function 사용하기 (feat. 지하철 혼잡도) --- (1) (0) | 2023.12.11 |
|---|---|
| [GPT4V]OpenAI DevDay, Opening Keynote (0) | 2023.11.08 |
| GPT-4 아키텍처, 인프라, 훈련 데이터셋, 비용, 비전, MoE (0) | 2023.07.18 |
| [OpenAI-GPT] LangChain 효율적인 Token 관리 (0) | 2023.05.21 |
| [LLM] ChatGPT Prompt Engineering for Developers - Chatbot (0) | 2023.05.07 |